Strongswan PSK IPsec IKEv2 VPN on Ubuntu 14.04 with Blackberry

This is a short guide on configuring Strongswan on Ubuntu 14.04 with pre-shared keys (PSK) for a Blackberry 10 device to connect with. Setting this up requires in-depth knowledge of networking and routing.

Install and configuring Strongswan:

sudo apt-get install strongswan

/etc/ipsec.conf

conn %default
        ikelifetime=60m
        keylife=20m
        rekeymargin=3m
        keyingtries=1
        keyexchange=ikev2
        authby=psk

config setup
        cachecrls=yes
        uniqueids=yes

conn default
    left=%any
    leftsubnet=10.7.100.0/24,192.168.0.0/24,0.0.0.0/0
    leftauth=psk
    right=%any
    rightauth=psk
    rightsendcert=never
    rightsourceip=10.7.100.10/30
    rightdns=8.8.8.8
    auto=add

/etc/ipsec.secrets

%any %any : PSK "yourGatewayPassword"

%any %any : PSK "yourUserPassword"

My server has one network interface connected to LAN and one interface connected directly to the internet. Both have internet routable gateways with the LAN gateway being the default. However, I will use the second interface for VPN connections so a second routing table is required for “same source routing” – allow internet traffic to respond through itself instead of routing through the LAN gateway by default. This may or may not be needed depending on the setup. The easier solution is to use the other gateway as default.

Configure same source routing:

sudo echo 2 ext >> /etc/iproute2/rt_tables

/etc/network/interfaces

# eth0/br0 config 
# ...
auto eth1
iface eth1 inet dhcp
   # automatically set up routing table and rules on up and down
   post-up ip route add default via `grep routers /var/lib/dhcp/dhclient.eth1.leases | tail -1 | awk '/routers/ {print $3}' | sed 's/;//'` dev eth1 table ext
   post-up ip rule add from `grep fixed-address /var/lib/dhcp/dhclient.eth1.leases | tail -1 | awk '/fixed-address/ {print $2}' | sed 's/;//'` lookup ext
   post-down ip rule del lookup ext
   metric 10
sudo ifdown eth1
sudo ifup eth1

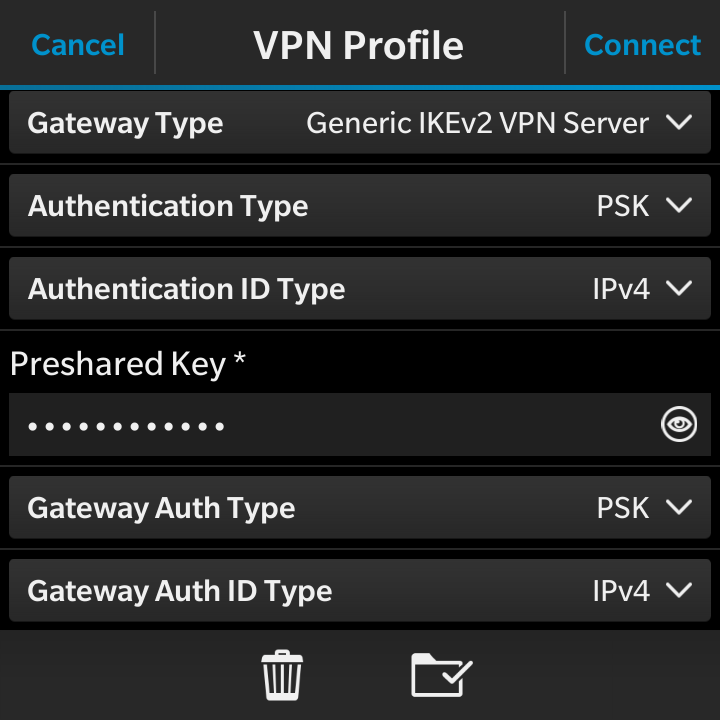
Configure Blackberry VPN profile:

Select General IKEv2 VPN server.

IMG_20150628_183531

References:
1. Advanced routing – http://www.rjsystems.nl/en/2100-adv-routing.php
2. Strongswan setup – http://www.math.ucla.edu/~jimc/documents/strongswan-1308.html
3. Strongswan Forwarding and Split Tunnelling – https://wiki.strongswan.org/projects/strongswan/wiki/ForwardingAndSplitTunneling

Posted in Uncategorized | Tagged , , , | Leave a comment

Running Ghost with cPanel on Shared Host via Rails

I have been looking to migrate my WordPress-driven blog over to Ghost but I don’t want to use a VPS since that would require me to configure and maintain every detail. Shared hosting is great in that it is essentially a managed instance – always updated, backed up, and available (depending on the quality of the host, of course). Most importantly, it’s someone else’s problem if there’s downtime.

This post is to document my steps to run Ghost or any other nodejs applications on a cPanel shared web host. While ssh is not required, it makes debugging and testing a little easier. At the time of writing, cPanel does not support nodejs apps natively (https://features.cpanel.net/topic/nodejs-hosting). However, they do support Rails 2 apps, so we can leverage Rails to bootstrap our nodejs app. Note, we cannot just run nodejs applications via command line because port(s) need to be mapped on the account such that yourdomain.com:12345 will be redirected correctly.

For the sake of completeness, I also looked at an alternative method (https://github.com/niutech/node.php) that uses PHP to proxy requests to a node app. That sounds incredibly dirty, though my method is also hacky but arguably less so. Anyway, here it goes.

Outline of steps:
1. Create 2 Rails Applications in cPanel
– one will be used to bootstrap
– second will not be used; we use the assigned port in Ghost or nodejs app
2. Modify Rails app #1 for bootstrapping
3. Install nodejs and npm
4. Upload and configure Ghost
5. Run it and setup redirects as needed
6. …
7. Profit!

1. Create 2 Rails Applications in cPanel
– one will be used to bootstrap
– second will not be used; we use the assigned port in Ghost or nodejs app
ghost_rails1
2. Modify Rails app #1 for bootstrapping

In the bootstrap Rails app ./config/boot.rb, append to the bottom:

1
2
3
4
5
6
7
8
pid = Process.fork
if pid.nil? then
  sleep 5
  exec '(cd ~/node_apps/ghost && npm install)'
  exec '/home/YOURUSERNAME/bin/node /home/YOURUSERNAME/node_apps/ghost/index.js'
else
  Process.detach(pid)
end

note: you may want to immediately exit from the Rails app
note2: screenshot application names maybe different from the commands shown here

3. Install nodejs and npm

1
2
3
4
5
6
7
8
9
10
wget http://nodejs.org/dist/v0.12.3/node-v0.12.3-linux-x64.tar.gz
tar xvf node-v0.12.3-linux-x64.tar.gz
mkdir -p ~/local/bin
cp node-v0.12.3-linux-x64/bin/node ~/local/bin/
rm -rf node-v0.12.3*
echo prefix = ~/local >> ~/.npmrc
wget https://www.npmjs.org/install.sh
chmod o+x install.sh
./install.sh
rm -rf install.sh

note: npm from the node package seems to be statically linked to /usr/local which you won’t have access to, so we install it directly with the prefix option

4. Upload and configure Ghost
– start the bootstrap Rails app from cPanel
ghost_rails4-1

ghost_rails4-2
5. Run it and setup redirects as needed

Posted in Uncategorized | Tagged , , , | Leave a comment

Installing Grub2 on Both GPT HD in Software RAID1 on Ubuntu 14.04

I installed Ubuntu 14.04 on 2x 3TB mdadm raid 1 and wanted both drives to be bootable in case one fails. This took a rather long time to figure out but this is how you do it. Below was tested on a vm.

GPT Partition Layout
1MB bios_grub
256MB /boot
3TB mdadm raid1 / lvm

1. Set labels on the /boot
2. Modify fstab to mount by label
3. Copy /boot to /boot of second drive
4. Update grub on the second drive

Ubuntu Test-2014-11-16-16-46-10

Ubuntu Test-2014-11-16-16-26-58

Ubuntu Test-2014-11-16-16-31-14
note: missing from the screenshot, but “grub-install /dev/sdb” might be needed

Posted in Uncategorized | Tagged | Leave a comment

PXE/Network ISO Boot with Ubuntu on Beagleboard and Tomato WRT54G

This is a short guide on configuring Ubuntu linux to provide network boot services to a local network. It works like this: DHCP responds with dhcp-boot option that tells the client to fetch the boot image from a certain computer. I have DHCP running on a WRT54G with the Tomato firmware and a Beagleboard running Ubuntu 12.04 to serve the boot images.

Image server:

sudo apt-get install syslinux
sudo apt-get install tftpd-hpa
sudo vim /etc/default/tftpd-hpa 
sudo cp /usr/lib/syslinux/pxelinux.0 /var/lib/tftpboot/
sudo cp /usr/lib/syslinux/menu.c32 /var/lib/tftpboot/
sudo cp /usr/lib/syslinux/memdisk /var/lib/tftpboot/
sudo vim /var/lib/tftpboot/pxelinux.cfg/default
ls /var/lib/tftpboot/
images  memdisk  menu.c32  pxelinux.0  pxelinux.cfg 

* note: might be missing some simple steps (mkdir, etc~

Content of /etc/default/tftpd-hpa:

# /etc/default/tftpd-hpa

TFTP_USERNAME="tftp"
TFTP_DIRECTORY="/var/lib/tftpboot"
TFTP_ADDRESS="0.0.0.0:69"
TFTP_OPTIONS="--secure"

Content of /var/lib/tftpboot/pxelinu.cfg/default:

default menu.c32
prompt 0
timeout 30
ontimeout BootLocal
noescape 1
allowoptions 0
menu title PXE Boot Server
label BootLocal
  localboot 0
label Clonezilla
  kernel memdisk
  append iso initrd=images/clonezilla-live-20140630-trusty-amd64.iso raw
label SystemRescueCD
  kernel memdisk
  append iso initrd=images/systemrescuecd-x86-4.3.0.iso

Setting in Tomato (Advanced DHCP):

dnsmasq

After that, set your bios to boot via network and you should see a menu for boot options at boot.

References:
https://help.ubuntu.com/community/PXEInstallServer
https://help.ubuntu.com/community/PXEInstallMultiDistro

Posted in Uncategorized | Tagged , , | Leave a comment

Amazon Elasticbeanstalk Nginx Https Redirect

I force all traffic to use https. It is much simpler to do the redirect at the application layer but it should really be done at the proxy before hitting the application. Here is the eb.config I use:

Note: This CANNOT be done with just one line in container_commands as the bootstrap script doesn’t like the escaped slashes in the return statement; it will error.

files:
  /tmp/deployment/nginx_https_redirect.sh:
    mode: "000755"
    content: |
      sed -i 's/8080;/8080;\n    if ($http_x_forwarded_proto != https) {\n      return 301 https:\/\/$http_host$request_uri;\n    }/' /tmp/deployment/config/#etc#nginx#conf.d#00_elastic_beanstalk_proxy.conf

container_commands:
  nginx_https_redirect:
    command: "/tmp/deployment/nginx_https_redirect.sh"
Posted in Uncategorized | Tagged , | Leave a comment

Installing NodeJS on CentOS 5 without Compiling

The EPEL repo for CentOS 5.x doesn’t include node. So it’s either compile or grab the precompiled executable. The latter is a lot faster.

1. Download the tar file from Nodejs.org:

1
wget http://nodejs.org/dist/v0.10.26/node-v0.10.26-linux-x64.tar.gz

2. extract

1
tar xvf node-v0.10.26-linux-x64.tar.gz

3. remove files and copy

1
2
3
cd node-v0.10.26-linux-x64
rm ChangeLog && rm LICENSE && rm README.md
cp -r . /usr/
Posted in Uncategorized | Leave a comment

Sideloading Blackberry 10 Android Apps (and Snap)

The chrome tool is clunky, I prefer the GUI deploy tool from the android tool chain.

Requirements:
-development mode enabled (settings > security and privacy > development mode)
-java runtime installed
-running OS 10.2.1+
-connected to local wifi
-proper bar(s) downloaded (snap available at http://redlightoflove.com/snap/)

1. Download and extract the command-line tools (2.0.1 beta at the time of writing). http://developer.blackberry.com/android/tools/
2. Find your Blackberry IP. Settings > About > Category Network > Wifi IPv4.
3. On linux, “./blackberry-deploy” to start the tool. On Windows, open blackberry-deploy.bat.
4. Select the bar, fill in the IP address from (2) and device password (if enabled), and deploy. That’s it!

blackberrydeploydialog

Posted in Uncategorized | Tagged , | Leave a comment

Adding Notch to PCI 5V Card to Fit In 3.3V PCI Slot

I recently ordered a pci-to-usb card and the pcb wasn’t exactly the one as shown in the picture. It’s missing the cutaway to fit in universal or 3.3v PCI slots. Without it, it will only fit in 5V slots. My motherboard only has one 5V slot, and it’s covered up by the video card.

IMG_00000218

Looking at the specs for the VIA 6216L USB controller chip, it is suppose to run at 3.3V, meaning there should be a notch there. So I looked up the pin configuration for PCI slot, made a cut with a hacksaw removing pins 12 and 13, and it slipped right in. Works as expected.

pci_notch

IMG_00000221

Posted in Uncategorized | 4 Comments

Simple Temp Folder Cleanup Script in Windows Task Scheduler

This is a simple script to automatically delete temporary files from a folder that are older than 2 weeks. I tend to download and work on a lot of files that don’t necessarily need to be archived after their first use. They can be used on demand in a batch file or, for me, scheduled to run every two days in task scheduler.

Relevant lines – one delete files, one delete folders:

  • forfiles -p “C:\Users\davychiu\Desktop\Temp Files” -s -m *.* -d -15 -c “cmd /c del /q /s @path”
  • forfiles -p “C:\Users\davychiu\Desktop\Temp Files” -d -15 -c “cmd /c if @ISDIR==TRUE echo rd /q /s @path &rd /q /s @path”

Temp Files Maintenance.xml

1
2
3
4
5
6
7
8
9
10
11
12
13
14
15
16
17
18
19
20
21
22
23
24
25
26
27
28
29
30
31
32
33
34
35
36
37
38
39
40
41
42
43
44
45
46
47
48
49
50
51
52
53
54
<?xml version="1.0" encoding="UTF-16"?>
<Task version="1.3" xmlns="http://schemas.microsoft.com/windows/2004/02/mit/task">
  <RegistrationInfo>
    <Date>2013-07-12T20:45:43.8641683</Date>
    <Author>COMTEK\davychiu</Author>
    <Description>Delete files in the Temp Files folder that are at least 15 days old.</Description>
  </RegistrationInfo>
  <Triggers>
    <CalendarTrigger>
      <StartBoundary>2013-07-12T00:00:00</StartBoundary>
      <Enabled>true</Enabled>
      <ScheduleByDay>
        <DaysInterval>2</DaysInterval>
      </ScheduleByDay>
    </CalendarTrigger>
  </Triggers>
  <Principals>
    <Principal id="Author">
      <UserId>S-1-5-18</UserId>
      <RunLevel>LeastPrivilege</RunLevel>
    </Principal>
  </Principals>
  <Settings>
    <MultipleInstancesPolicy>IgnoreNew</MultipleInstancesPolicy>
    <DisallowStartIfOnBatteries>true</DisallowStartIfOnBatteries>
    <StopIfGoingOnBatteries>true</StopIfGoingOnBatteries>
    <AllowHardTerminate>true</AllowHardTerminate>
    <StartWhenAvailable>false</StartWhenAvailable>
    <RunOnlyIfNetworkAvailable>false</RunOnlyIfNetworkAvailable>
    <IdleSettings>
      <StopOnIdleEnd>true</StopOnIdleEnd>
      <RestartOnIdle>false</RestartOnIdle>
    </IdleSettings>
    <AllowStartOnDemand>true</AllowStartOnDemand>
    <Enabled>true</Enabled>
    <Hidden>true</Hidden>
    <RunOnlyIfIdle>false</RunOnlyIfIdle>
    <DisallowStartOnRemoteAppSession>false</DisallowStartOnRemoteAppSession>
    <UseUnifiedSchedulingEngine>false</UseUnifiedSchedulingEngine>
    <WakeToRun>false</WakeToRun>
    <ExecutionTimeLimit>P3D</ExecutionTimeLimit>
    <Priority>7</Priority>
  </Settings>
  <Actions Context="Author">
    <Exec>
      <Command>forfiles</Command>
      <Arguments>-p "C:\Users\davychiu\Desktop\Temp Files" -s -m *.* -d -15 -c "cmd /c del /q /s @path"</Arguments>
    </Exec>
    <Exec>
      <Command>forfiles</Command>
      <Arguments>-p "C:\Users\davychiu\Desktop\Temp Files" -d -15 -c "cmd /c if @ISDIR==TRUE echo rd /q /s @path &amp;rd /q /s @path"</Arguments>
    </Exec>
  </Actions>
</Task>
Posted in Uncategorized | Tagged , | 2 Comments

Password Authentication and No-caching Squid Proxy Server

This is a short guide on setting up a password based, non caching, and non logging Squid 3 proxy server. I am using Squid 3.1 on Ubuntu 11.10.

1
2
3
4
sudo apt-get install squid                                                                        
htdigest -c /etc/squid/passwords proxy user
vim /etc/squid/squid.conf
/etc/init.d/squid restart

Add to squid.conf:

1
2
3
4
5
6
7
8
9
10
11
12
13
14
15
# disable all logging
access_log none
cache_store_log none
cache_log /dev/null
cache deny all

# required access controls for Squid version < 3.2
acl manager proto cache_object
acl localhost src 127.0.0.1/32 ::1
acl to_localhost dst 127.0.0.0/8 0.0.0.0/32 ::1

# password authentication, *the filename is different depending on the distro*
auth_param digest program /usr/lib/squid/digest_pw_auth -c /etc/squid/passwords
auth_param digest realm proxy
acl authenticated proxy_auth REQUIRED
Posted in Uncategorized | Leave a comment