1:1 NAT with iptables and KVM

Use libvirt to add a network with NAT forwarding to an interface. It will add most of the iptables rules for you. It should looks something like below.
“iptables -L”:

Chain FORWARD (policy ACCEPT)
target     prot opt source               destination
ACCEPT     all  --  anywhere             10.7.0.0/24         state RELATED,ESTABLISHED
ACCEPT     all  --  10.7.0.0/24          anywhere
ACCEPT     all  --  anywhere             anywhere
REJECT     all  --  anywhere             anywhere            reject-with icmp-port-unreachable

“iptables -t nat -L”:

Chain POSTROUTING (policy ACCEPT)
target     prot opt source               destination
MASQUERADE  tcp  --  10.7.0.0/24         !10.7.0.0/24         masq ports: 1024-65535
MASQUERADE  udp  --  10.7.0.0/24         !10.7.0.0/24         masq ports: 1024-65535
MASQUERADE  all  --  10.7.0.0/24         !10.7.0.0/24

The outward-going iptables chains are already there. To allow incoming packets and 1:1 port mapping, add the following. Change addresses and interface names as needed.

iptables -I FORWARD -i eth1 -o virbr1 -d 10.7.0.0/24 -j ACCEPT
iptables -t nat -i eth1 -j DNAT --to-destination=10.7.0.1

Note: the first rule is the same rule as rule #1 in FORWARD but without the ESTABLISHED state condition.

To make the iptables permanent, use either “iptables-save” or add the rules to /etc/sysconfig/iptables. Everything should work at this point. If not, make sure forwarding is enabled.

echo "1" > /proc/sys/net/ipv4/ip_forward
#permanently set forwarding in /etc/sysctl.conf
Posted in Uncategorized | Tagged | 2 Comments

Squid 3.1 Ad Block

It seems like the Squid 3.x (at least for 3.1) parses acl rules a bit differently. I needed to add “all” to the http_access deny for it to work.

acl ads dstdom_regex  "/etc/squid/ad_block.txt"
http_access deny all ads

Instructions for initial setup can be found at https://calomel.org/squid_adservers.html.

Posted in Uncategorized | Leave a comment

Installing Squid 3.1 on CentOS 5.6 with SELinux

Since there are no official packages of Squid 3.1 for CentOS or RHEL, the only ways to install are compiling from source or via 3rd party rpm. My method may not be proper so if there are any glaring mistakes, please let me know. Alternate method via 3rd party Yum repository here.

1. Download the RPM from http://people.redhat.com/jskala/squid/

yum install perl-DBI
rpm -ivh squid-3.1.8-1.el5.x86_64.rpm

2. At this point, add or change any settings in /etc/squid/squid.conf. Make sure to add visibile_hostname or squid will complain later.
3. Change owner to squid.

chown squid:squid /var/spool/squid
chown squid:squid /usr/local/squid

4. Initialize squid cache directory.

squid -z

5. Create SELinux policy.

setenforce 0
squid -d 1
setenforce 1
grep "AVC.*squid" /var/log/audit/audit.log|audit2allow -M squid
semodule -i squid.pp

5. Start squid.

service squid start
[root@rukia ~]# service squid restart
Stopping squid: ................                           [  OK  ]
Starting squid: .                                          [  OK  ]

If squid starts fine and users are still unable to connect, check firewall in iptables and confirm rules. In my case, I needed to add:

iptables -I RH-Firewall-1-INPUT -i eth0 -s 192.168.0.0/24 -j ACCEPT

http://wiki.centos.org/HowTos/SELinux

Posted in Uncategorized | Tagged | Leave a comment

Using TC to Limit Uplink Bandwidth in Linux

Short guide on using TC to force users to obey a certain upload speed in linux.

#First add a 'root' for eth1
tc qdisc add dev eth1 root handle 1: htb default 30
#Second add a class (bucket) with bandwidth restrictions
tc class add dev eth1 parent 1: classid 1:2 htb rate 64kbit
#Then add a filter to force packets through the class
tc filter add dev eth1 protocol ip parent 1:0 prio 1 handle 1 fw classid 1:2

tc filter is usually sufficient as it can analyze packets with u32; however, I used iptables for simplicity. I mark a single computer with ip 192.168.0.22.

#Use iptables to tag the packet with a '1' so the filter can 'handle' it
iptables -t mangle -I PREROUTING -s 192.168.0.22/32 -j MARK --set-mark 0x1

Check whether packets are flowing through the class with

 tc -s class show eth1
Posted in Uncategorized | Tagged | 9 Comments

Batch to Turn Off Display in Windows 7

Here is a simple way to turn off the display in Windows 7. It is not instantaneous, but I can live with it waiting one minute. The script temporarily changes the idle time to 1 minute, waits 65 seconds for the display to turn off, and then changes it back to the original (20 minutes) idle time.

monitor_off.bat:

powercfg -change -monitor-timeout-ac 1
timeout /t 65
powercfg -change -monitor-timeout-ac 20
Posted in Uncategorized | Tagged | 3 Comments

Limit Handbrake Useable CPU Cores in Windows

The CPU limit argument of Handbrakes seems to have no effect in Windows. One way to get around this is to start Handbrake with the built-in “start” command with the affinity argument.

start /wait /affinity 33 "" "C:\Program Files (x86)\MC-TVConverter\tools\handbrake\HandBrakeCLI.exe" -i "K:\example.mkv" -e x264 -q 20.0 -d -a 1 -E faac -B 128 -6 dpl2 -R Auto -D 0.0 -f mp4 -C 2 -X 720 -m -x cabac=0:ref=2:me=umh:bframes=0:weightp=0:subme=6:8x8dct=0:trellis=0 -o "K:\example.mp4"

Here, I use a batch to encode files numbered sequentially.

@echo on
set count=10
:run
set /a filenumber=%count%
if %count% lss 10 set filenumber=0%count%
start /wait /affinity 33 "" "C:\Program Files (x86)\MC-TVConverter\tools\handbrake\HandBrakeCLI.exe" -i "K:\exapmple%filenumber%.mkv" -e 
x264 -q 20.0 -d -a 1 -E faac -B 128 -6 dpl2 -R Auto -D 0.0 -f mp4 -C 2 -X 720 -m -x 
cabac=0:ref=2:me=umh:bframes=0:weightp=0:subme=6:8x8dct=0:trellis=0 -o "K:\example%filenumber%.mp4"
set /a count+=1
if %count% leq 13 goto :run

Affinity takes an hex input. For example, forcing only the use of cores 0,1,4,5 requires an affinity of 33 (110011).

Posted in Uncategorized | Tagged , | Leave a comment

Installing Tinyproxy

Short guide on installing Tinyproxy in CentOS on an OpenVZ VPS.

[root@shizuka ~]# yum install tinyproxy

At this point, you need to edit the conf file and add an “Allow x.x.x.x/xx” line to let users access the proxy.

[root@shizuka ~]# vi /etc/tinyproxy.conf

When done, starting tinyproxy as is will fail as it needs some files that cannot be created by the default user.

[root@shizuka ~]# tinyproxy -d
tinyproxy: Could not open file /var/log/tinyproxy/tinyproxy.log: Permission denied
tinyproxy: Could not open file /var/run/tinyproxy/tinyproxy.pid: Permission denied
tinyproxy: Could not create PID file.

Fix the error by creating the files and transferring ownership.

[root@shizuka ~]# echo "" >> /var/log/tinyproxy/tinyproxy.log
[root@shizuka ~]# echo "" >> /var/run/tinyproxy/tinyproxy.pid
[root@shizuka ~]# chown nobody:nobody /var/log/tinyproxy/tinyproxy.log
[root@shizuka ~]# chown nobody:nobody /var/run/tinyproxy/tinyproxy.pid

Tinyproxy should start with no problems.

Posted in Uncategorized | Tagged | 3 Comments

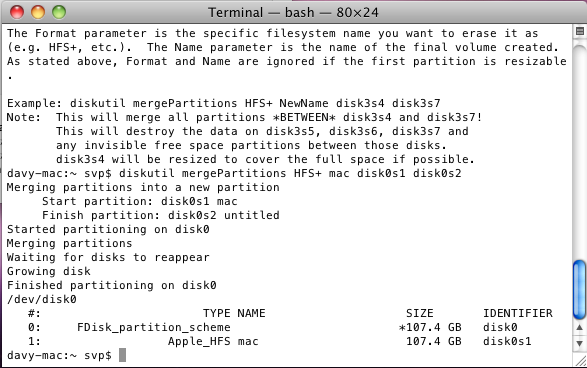
Expanding HFS Partition in MacOSX

When you grow disk in VMWare, MacOSX does not allow you to do much with it. The easiest way to extend the partition is to create a new one in the free space with GParted and then merge them.

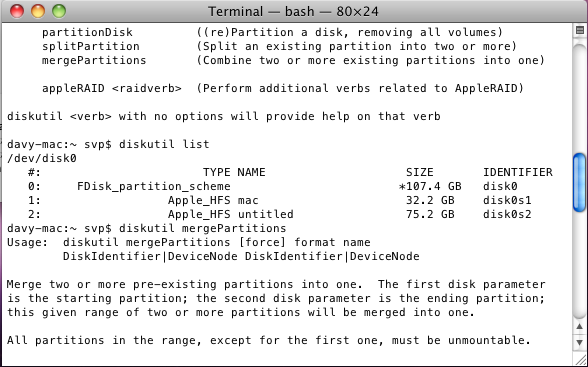
diskutil mergePartitions HFS+ NewPartitionName disk0s1 disk0s2

Posted in Uncategorized | Leave a comment

Resizing Logical Volume & Swap on Redhat/CentOS VM

My CentOS vm was near the capacity of its allocated VHD. I used VHD Resizer from VMToolKit to expand the file container.
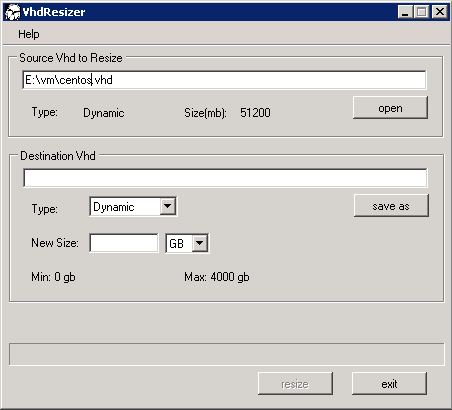
Once it is expanded, the inner layers must expanded as well. This is a collection of info I found on google.

Resizing the “main” volume

1. fdisk /dev/sda then press p

Disk /dev/sda: 40.0 GB, 40020664320 bytes
255 heads, 63 sectors/track, 4865 cylinders
Units = cylinders of 16065 * 512 = 8225280 bytes

Device Boot      Start         End      Blocks   Id  System
/dev/sda1   *           1          13      104391   83  Linux
/dev/sda2              14        1188     9438187+  8e  Linux LVM

2. Press d then 2 to remove the partition
3. Press n then primary p start cylinder 14 last cylinder 4865 to add the newly re-sized partition. WARNING: Make sure the old and new partition start at the same cylinder position, not doing so will destroy your data.
4. Press t partition 2 Hex code 8e
5. Press p

Disk /dev/sda: 40.0 GB, 40020664320 bytes
255 heads, 63 sectors/track, 4865 cylinders
Units = cylinders of 16065 * 512 = 8225280 bytes

   Device Boot      Start         End      Blocks   Id  System
/dev/sda1   *           1          13      104391   83  Linux
/dev/sda2              14        4865    38973690   8e  Linux LVM

6. Finally press w write table to disk and exit and reboot
7. Use vgdisplay, pvdisplay, or lvdisplay to show the current and later ending size of your LV
8. Run pvresize /dev/sda2 to expand the PV on /dev/sda2 after enlarging the partition with fdisk
9. You could also extend the volume group across disks and partitions: pvcreate /dev/hdb1; vgextend videovg /dev/hdb1; vgdisplay videovg. With this method use fdisk to create a new partition instead of recreating the original one. This is certainly safer since there is less risk to your existing data and it makes it easier to break up volume groups in the future.
10. Use vgdisplay to find the Free PE / Size

  --- Volume group ---
  VG Name               SystemVG
  System ID
  Format                lvm2
  Metadata Areas        1
  Metadata Sequence No  7
  VG Access             read/write
  VG Status             resizable
  MAX LV                0
  Cur LV                2
  Open LV               2
  Max PV                0
  Cur PV                1
  Act PV                1
  VG Size               37.17 GB
  PE Size               4.00 MB
  Total PE              9515
  Alloc PE / Size       2176 / 8.50 GB
  Free  PE / Size       7339 / 28.67 GB
  VG UUID               Bl4LEQ-R70i-3Qse-9z1p-BRcK-ibd7-2aelYx

11. Use lvdisplay to display current logical volumes

  --- Logical volume ---
  LV Name                /dev/SystemVG/RootLV
  VG Name                SystemVG
  LV UUID                dxB6Fs-6sQr-AaLg-1zQ6-Q1f9-AN6V-cbSovF
  LV Write Access        read/write
  LV Status              available
  # open                 1
  LV Size                8.00 GB
  Current LE             2048
  Segments               1
  Allocation             inherit
  Read ahead sectors     0
  Block device           253:0

  --- Logical volume ---
  LV Name                /dev/SystemVG/SwapLV
  VG Name                SystemVG
  LV UUID                vSRWGx-zy8N-FrXK-3HP5-7pwW-F6SQ-IRJNeA
  LV Write Access        read/write
  LV Status              available
  # open                 2
  LV Size                512.00 MB
  Current LE             128
  Segments               1
  Allocation             inherit
  Read ahead sectors     0
  Block device           253:1

12. lvextend -l +7339 /dev/SystemVG/RootLV (you can use the following to reduce again lvreduce -l -7339 /dev/SystemVG/RootLV)
13. lvdisplay /dev/SystemVG/RootLV to see the result

  --- Logical volume ---
  LV Name                /dev/SystemVG/RootLV
  VG Name                SystemVG
  LV UUID                dxB6Fs-6sQr-AaLg-1zQ6-Q1f9-AN6V-cbSovF
  LV Write Access        read/write
  LV Status              available
  # open                 1
  LV Size                36.67 GB
  Current LE             9387
  Segments               2
  Allocation             inherit
  Read ahead sectors     0
  Block device           253:0

14. ext2online /dev/SystemVG/RootLV while the filesystem is mounted or to be safe use resize2fs /dev/SystemVG/RootLV while the filesystem is unmounted.

http://www.linuxquestions.org/questions/fedora-35/lvm-partition-resizing-666683/

Resizing the swap

Look for the swap logical volume.

cat /etc/fstab | grep swap
/dev/VolGroup00/LogVol01 swap                    swap    defaults        0 0

Check current size with lvdisplay.

lvdisplay /dev/VolGroup00/LogVol01

--- Logical volume ---
LV Name                /dev/VolGroup00/LogVol01
VG Name                VolGroup00
LV UUID                RVIFz3-B8kp-z9KV-JYtG-N997-JOQ6-ETaJaJ
LV Write Access        read/write
LV Status              available
# open                 1
LV Size                512.00 MB
Current LE             24
Segments               1
Allocation             inherit
Read ahead sectors     0
Block device           253:1

Unmount the swap with swapoff.

swapoff /dev/VolGroup00/LogVol01

Resize and mount swap.

lvresize /dev/VolGroup00/LogVol01 -L 768M
Extending logical volume LogVol01 to 768.00 MB
Logical volume LogVol01 successfully resized

mkswap /dev/VolGroup00/LogVol01
swapon /dev/VolGroup00/LogVol01
free -m
total       used       free     shared    buffers     cached
Mem:           375        343         32          0         48        120
-/+ buffers/cache:        174        201
Swap:          767          0        767

http://ukstokes.com/blog/2008/08/12/resize-swap-partitions-on-red-hat-linux/
Posted in Uncategorized | Tagged | 1 Comment

Hirens Bootcd with VMware

It seems VMware can only boot cds with an IDE CDROM device. If the VM only has a SCSI CDROM, add an IDE one to the vmx file. GParted or Hirens should boot after.

Posted in Uncategorized | Tagged | Leave a comment