AES Encryption/Decryption in Python

This is a snippet in using the PyCrypto package in Python to encrypt and decrypt with AES. The first one implements AES CFB mode – padding is not required for byte alignment. The second one implements AES CBC and PKCS7 padding to byte align the secret message.

PyCrypto Reference: https://www.dlitz.net/software/pycrypto/api/current/

Salt – randomizes the hash of the key; prevents rainbow table attacks against the key
IV (initialization vector) – randomizes the encrypted message; prevents rainbow table attacks against the message
Derived Key – lengthens and strengthens the key via hashing; used instead of the original key; slows down brute-force attacks against the key

AES CFB

1
2
3
4
5
6
7
8
9
10
11
12
13
14
15
16
from Crypto.Cipher import AES
from Crypto.Protocol.KDF import PBKDF2
from Crypto import Random

key_size = 32 #AES256
iterations = 10000
key = b'password'
secret = b'a very secret message'

salt = Random.new().read(key_size) #salt the hash
iv = Random.new().read(AES.block_size)
derived_key = PBKDF2(key, salt, key_size, iterations)
cipher = AES.new(derived_key, AES.MODE_CFB, iv)

encodedtext = iv + cipher.encrypt(secret)
decodedtext = str(cipher.decrypt(encodedtext))[16:] #remove iv

AES CBC

1
2
3
4
5
6
7
8
9
10
11
12
13
14
15
16
17
18
19
from Crypto.Cipher import AES
from Crypto.Protocol.KDF import PBKDF2
from Crypto import Random

key_size = 32 #AES256
iterations = 10000
key = b'password'
secret = b'a very secret message'

length = 16 - (len(secret) % 16) #PKCS7 adds bytes of the length of padding
secret += chr(length) * length

salt = Random.new().read(key_size) #salt the hash
iv = Random.new().read(AES.block_size)
derived_key = PBKDF2(key, salt, key_size, iterations)
cipher = AES.new(derived_key, AES.MODE_CBC, iv)

encodedtext = iv + cipher.encrypt(secret)
decodedtext = str(cipher.decrypt(encodedtext))[16:-ord(decodedtext[-1])] #remove iv and padding
Posted in Uncategorized | Tagged , , | Leave a comment

Converting a Bullet List in Word to HTML

The obvious solution is to save as an html document in Word, but the markup produced is not usable. There are several ways to convert the content into clean html.

word-html2

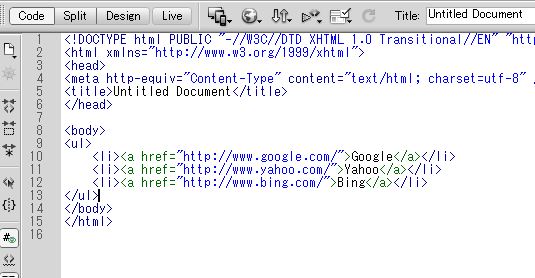
1. Copy/Paste into Dreamweaver in Design Mode.

word-html1

2. Copy/Paste into WordPress in Visual Mode.

word-html3

3. Script a macro to pull out all the links. Referenced from: microsoft

1
2
3
For Each objHyperlink in ActiveDocument.Hyperlinks
    ActiveDocument.Words.Last.InsertAfter(vbcrlf & "<li><a href=""" & objHyperlink.Addres & """>" & objHyperlink.TextToDisplay & "</a></li>")
Next
Posted in Uncategorized | Leave a comment

Apple Wireless Keyboard in Windows 7 64bit

Windows doesn’t have the drivers by default. They are bundled with Boot Camp. Installing Boot Camp will also enable the special function keys, like volume up and down.

1. Download and install Boot Camp 3.0 from:
insanelymac.com (look for M4xim’s post)
2. Download and install updates from Apple in sequence (3.1, 3.2, 3.3, …) to the latest one. Apple Download
3. Reboot and everything should be working. I had to manually add program files\boot camp\bootcamp.exe to my startup folder as it wasn’t starting at login for the feature keys.

Note: Depending on the version of the keyboard, it may not be necessary to update all the way to the latest version.

Posted in Uncategorized | Leave a comment

Disconnecting Internet Access without Unplugging

This is disabling the internet for the lazy. The back of the computer is usually filthy and not very accessible, so here are three ways to accomplish this inside Windows.

1. Disable the Network Adapter.

Bottom right, Network and Sharing Center, Local Area Connection, and click disable:

disable_net1

Disabling the adapter is not always ideal in some cases; especially with VMs running.

2. Temporarily delete the default gateway.

Open the command prompt with administrator privileges.

disable_net2

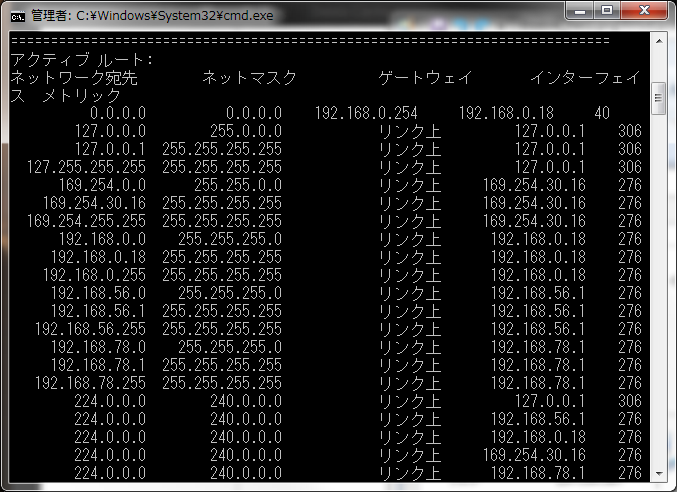
Check the default route (0.0.0.0 mask 0.0.0.0). Remember the gateway.

disable_net3

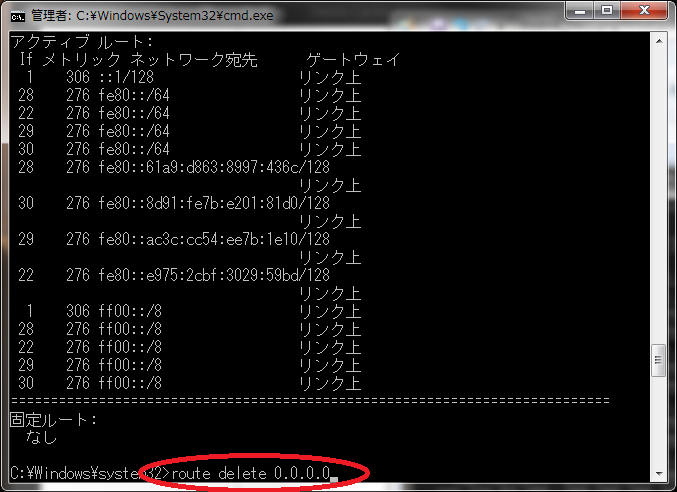
Delete it.

disable_net4

Internet is inaccessible at this point. Add it back after.

route add 0.0.0.0 mask 0.0.0.0 192.168.0.254

3. ipconfig /release and afterward, ipconfig /renew

Posted in Uncategorized | Leave a comment

Django Custom Decorators

Here is a short guide on using custom decorators in Django as I did not find one with a good explanation. A decorator is essentially a function that is wrapped around the original. They are defined in TWO slightly different ways depending on whether parameters are used. Example:

in views.py

1
2
3
4
5
6
7
8
9
#no parameter                                                            
@something_required
def my_view(request, item_id):
    return ...

#with parameter
@something_required_with('parameter')
def my_view2(request, item_id):
    return...

If there are parameters, the view function will be wrapped TWICE.

in decorators.py

1
2
3
4
5
6
7
8
9
10
11
12
13
14
15
16
17
18
19
20
21
22
23
24
25
26
27
from functools import wraps
from django.http import HttpResponse, HttpResponseRedirect
from django.utils.decorators import available_attrs

#no parameter
def something_required(view_func):
    @wraps(view_func, assigned=available_attr(view_func))
    def wrapper(request, *args, **kwargs)
        item_id = kw.get('item_id', None)
        if item_id:
            return view_func(request, *args, **kwargs)
        else:
            return HttpResponseRedirect('home')
    return wrapper

#with parameter
def something_required_with(parameter):
    def decorator(view_func): #second wrapper gets view_func
        @wraps(view_func, assigned=available_attr(view_func))
        def wrapper(request, *args, **kwargs)
            item_id = kw.get('item_id', None)
            if item_id == parameter:
                return view_func(request, *args, **kwargs)
            else:
                return HttpResponseRedirect('home')
        return wrapper
    return decorator
Posted in Uncategorized | Tagged , | Leave a comment

iOS Splitscreen Collection Views with Storyboard

A quick tutorial on how to embed two collection views into a single controller. It will look like the image below. It can be extended to use other types of views.

iOS Simulator Screen shot 2013-02-01 5.04.41 AM

  1. Create a simple view application.
  2. In storyboard, Editor>Embed In>Navigation Controller on the default view.
  3. Add two ‘Collection View’s (not Collection View Controller)
  4. Differentiate one with tag ‘1’.
  5. Give the CollectionViewCells reusable identifiers and create classes for them.
  6. Add imageViews and link them.
  7. Right-click on the Collection Views and attach datasource and delegate to the parent view controller.
  8. Implement the functions in ViewController.m

It should look like:

1
2
3
4
5
6
7
8
9
10
11
12
13
14
15
16
17
18
19
20
21
22
23
24
25
26
27
28
29
30
31
32
33
34
35
36
37
38
39
40
41
42
43
44
45
46
47
48
49
50
51
52
53
54
55
56
57
58
//
//  ViewController.m
//  splitscreen2
//
//  Created by Davy Chiu on 2013-02-01.
//  Copyright (c) 2013 Davy Chiu. All rights reserved.
//

#import "ViewController.h"
#import "TopCell.h"
#import "BottomCell.h"

@interface ViewController ()

@end

@implementation ViewController

- (void)viewDidLoad
{
    [super viewDidLoad];
    // Do any additional setup after loading the view, typically from a nib.
}

- (void)didReceiveMemoryWarning
{
    [super didReceiveMemoryWarning];
    // Dispose of any resources that can be recreated.
}

- (NSInteger)collectionView:(UICollectionView *)view numberOfItemsInSection:(NSInteger)section
{
    if (view.tag == 0) {
        return 1;
    } else {
        return 9;
    }
}

- (UICollectionViewCell *)collectionView:(UICollectionView *)cv cellForItemAtIndexPath:(NSIndexPath *)indexPath
{
    if (cv.tag == 0) {
        TopCell *cell = [cv dequeueReusableCellWithReuseIdentifier:@"TopCell" forIndexPath:indexPath];
   
        cell.imageView.image = [UIImage imageNamed:[[NSString stringWithFormat:@"female%d",indexPath.row]stringByAppendingString:@".png"]];
   
        return cell;
    } else {
        BottomCell *cell = [cv dequeueReusableCellWithReuseIdentifier:@"BottomCell" forIndexPath:indexPath];
       
        cell.imageView.image = [UIImage imageNamed:[[NSString stringWithFormat:@"female%d",indexPath.row]stringByAppendingString:@".png"]];
       
        return cell;
    }
}


@end
Posted in Uncategorized | 2 Comments

Threaded Comments in Ruby on Rails

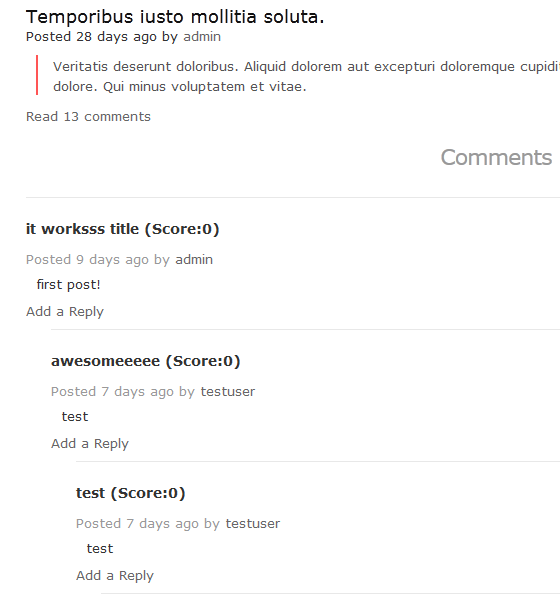
This is the basic structure of a threaded commenting system in Ruby on Rails (3.2.9). Comment model uses polymorphic associations to differentiate between which model it belongs to.

threaded_comments

config/routes.rb

1
2
3
4
5
6
resources :comments do
  resources :comments
end
resources :posts do                                                      
  resources :comments
end

app/models/comments.rb

1
2
3
4
5
6
7
8
9
10
11
12
13
14
15
16
17
18
19
20
21
22
23
24
25
26
27
28
# == Schema Information
#
# Table name: comments
#
#  id               :integer          not null, primary key
#  user_id          :integer
#  commentable_id   :integer
#  content          :text
#  enabled          :boolean
#  created_at       :datetime         not null
#  updated_at       :datetime         not null
#  commentable_type :string(255)
#  title            :string(255)
#

class Comment < ActiveRecord::Base
  attr_accessible :comment_id, :content, :enabled, :user_id, :title, :parent_id
  belongs_to :user
  belongs_to :post
  belongs_to :comment

  belongs_to :commentable, :polymorphic => true

  has_many :comments, :as => :commentable
  has_many :votes, :as => :voteable

  validates :user_id, presence: true
  validates :content, presence: true, length: { maximum: 25000 }

app/controllers/comments_controller.rb

1
2
3
4
5
6
7
8
9
10
11
12
13
14
15
16
17
18
19
20
21
22
23
24
25
26
27
28
29
30
31
32
33
34
35
36
37
38
39
40
41
42
43
44
45
46
47
48
49
50
51
52
53
54
55
56
57
58
59
60
61
62
63
64
65
66
67
68
69
70
71
72
73
74
75
class CommentsController < ApplicationController
  before_filter :load_commentable
  def index
    @comments = @commentable.comments

    respond_to do |format|
      format.html # index.html.erb
    end
  end

  def show
    @comment = @commentable.comments.find(params[:id])

    respond_to do |format|
      format.html # show.html.erb
    end
  end

  def new
    @comment = @commentable.comments.new
    @comment.parent_id = params[:parent_id]

    respond_to do |format|
      format.html # new.html.erb
      format.js
    end
  end

  def edit
    @comment = @commentable.comments.find(params[:id])
  end
  def create
    @comment = @commentable.comments.new(params[:comment])
    @comment.user = current_user
    @comment.content = ActionView::Base.full_sanitizer.sanitize(@comment.content)
    @post = Post.find(@comment.parent_id)

   respond_to do |format|
      if @comment.save
        format.html { redirect_to @post} #only for replies
        format.js #ajax post, remove for testing
      else
        format.html { render :action => "new" }
      end
    end
  end

  def update
    @comment = @commentable.comments.find(params[:id])

    respond_to do |format|
      if @comment.update_attributes(params[:comment])
        format.html { redirect_to @comment, :notice => 'Comment was successfully updated.' }
      else
        format.html { render :action => "edit" }
      end
    end
  end

  def destroy
    @comment = @commentable.comments.find(params[:id])
    @comment.destroy

    respond_to do |format|
      format.html { redirect_to comments_url }
    end
  end

  private

  def load_commentable
    resource, id = request.path.split('/')[1, 2]
    @commentable = resource.singularize.classify.constantize.find(id)
  end
end

app/views/comments/_comment.html.erb

1
2
3
4
5
6
7
8
9
10
11
12
13
14
15
<li class="comment" id="comment-<%= comment.id %>">
  <h5><%= comment.title %> (Score:0)</h5>
  <span class="detail">Posted <%= time_ago_in_words(comment.created_at) %> ago by <%= link_to comment.user.name, comment.user %></span>
  <div class="body">
    <%= comment.content %>
  </div>
  <% if @post %>
    <p><%= link_to 'Add a Reply', new_comment_comment_path(comment, :parent_id => @post.id) %></p>
    <% unless comment.comments.empty? %>
      <ul class="nested_comment">
        <%= render comment.comments %>
      </ul>
    <% end %>
  <% end %>
</li>

app/views/posts/_post.html.erb

1
2
3
4
5
6
<li>
  <span class="title"><%= link_to post.title, post %></span>
  <span class="timestamp">Posted <%= time_ago_in_words(post.created_at) %> ago</span>&nbsp;<span class="postedby">by <%= link_to post.user.name, post.user %></span>
  <span class="content"><%= raw post.content %></span>
  <span class="comment_count"><%= link_to post.comments.count > 0 ? "Read " + pluralize(count_threaded(post.comments), "comment"):"No comments yet", post %></span>
</li>
Posted in Uncategorized | Tagged | Leave a comment

Blackberry Mobile Hotspot with Fido

I recently updated my Bold to the 7.1 OS for the mobile hotspot feature. However, when I tried to activate it, I got an error saying that it was not supported by my network service provider. To fix it, I had to login to my BIS account and resend the service books.

Posted in Uncategorized | Leave a comment

MBET Q&A for Prospective Students

I had someone who is still on the fence whether to embark on the MBET (Master of Business, Entrepreneurship, and Technology) journey email me about the program and my experience. I thought it would be useful for anyone considering the program to see how it was for me. I would be happy to answer any further questions (life in Waterloo, etc) via email.

What did you think of the MBET program so far?
The program so far has been what I expected for most parts. We get a lot of hands-on experience to practice the theory we learn in class. Coming from engineering, the exposure to business strategy and accounting were vital to the development of a business sense. The community involvement project where groups paired up with local not-for-profit organizations to develop strategy for their projects was different from everyday work but it was interesting and rewarding.

What was your reason for doing the MBET program?
-business skills for new venture creation
-opportunities for networking
-1 year program
-tech hub of Canada
-mix of international and local students (global network)
-entrepreneur support
-live in eastern Canada

I’ve heard from past MBET graduates that they have done class trips to other cities (most notably Boston), did that happen with your class?
I have also heard about this but the budget for those events seem to have tightened. For my practicum team, we went to the Ivey school of business to participate in a business plan competition with expenses paid for. In terms of class events, so far we had two opportunities to go to various conferences in Toronto.

How effective was it in helping you achieve your career goals? (I realize you haven’t graduated yet, but still good to know if what you learned from this program will help you achieve your goals or not)
Difficult to say for now, but the people you meet here are very willing to help or connect you with other people who can. It is common to meet executives around the area at networking events who would be beneficial to reach out to for advice later on.

What is the most challenging aspect of the MBET program?
I was expecting something similar to an undergrad engineering degree in terms of intensity. At times, it feels like it but it is mostly due to the lack of coordination between the courses for due dates of assignments and the lack of motivation from students who are not developing ventures. A couple of the courses could be more engaging in my opinion.

If you could go back in-time, would you still go for the MBET program (invest tuition and a year in school) or pursue a full-time job (make money right away)?
Definitely. The skills you develop and the friends you make here alone are worth the time and money. For me, I wanted to look at things from both an engineering and business perspective, and the program delivered that.

What’s your best advice you can give to someone going into the MBET program?
-take any opportunity for networking
-make use of the support from the faculty in your venture
-if you have an business idea you want to develop during the program, work on it as a practicum project. (This requires that it has progressed far enough. Email Doug for details.) – even if you don’t have an idea now, I highly suggest you come up with one. Working for another company for the practicum is a chore at times.

What are you doing for your practicum?
My group is working with Clearpath Robotics.
They started as a practicum in the program several years ago developing various robots. We worked on the competitor analysis, market sizing and are now working on a goto market strategy for one of their new products.
One of the problems we discovered too late was that many of the business plan competitions require the students competing to have majority ownership of the company. Unless the practicum still has owners who are students, it is very difficult to compete as the practicum company.

To make the most out of the program, you need to work on your own idea from the start.

Posted in Uncategorized | Leave a comment

Installing Squid 3.1 on CentOS 5.6 with SELinux and cachemgr via Yum

This is a short guide on installing the latest version of Squid via Yum. I have a guide on installing via RPM here. This was tested on CentOS 5.6 but should also work on CentOS 6.x.

1. Get the PP repository.

wget -q -O- "http://devel.pramberger.at/getrepo?release=5" >> /etc/yum.repos.d/pramberger.repo

2. Install Squid (and Apache for cachemgr).

yum install httpd squid3

3. Make changes to squid.conf.

vi /etc/squid/squid.conf

4. Build Squid cache structure.

squid -z

5. Allow incoming connections through the firewall to Squid and Apache.

iptables -I RH-Firewall-1-INPUT -p tcp --dport 3128 -i eth0 -j ACCEPT
iptables -I RH-Firewall-1-INPUT -p tcp --dport 80 -i eth0 -j ACCEPT

6. Start Squid and Apache. Users should be able to browse through Squid at this point.

service squid start
service httpd start

7. In a browser, to go http://servername/squid to generate the policies. The page will show socket error. Fix by adding SE policies.

grep "AVC.*cachemgr" /var/log/audit/audit.log | audit2allow -M cachemgr
semodule -i cachemgr.pp

8. Make settings persistent.

chkconfig squid on
chkconfig httpd on
iptables-save
Posted in Uncategorized | 4 Comments